Pages

Sunday 29 March 2020

Baked Chinese Sausage Buns

Since everyone and their dog seems to be baking and cooking up a storm, I decided to make some Chinese sausage buns. I looked up a couple of recipes and checked to see if I had all the ingredients, luckily I did!


Baby doesn’t like green onion so I made some without.


I actually found it therapeutic making the bread and then twisting it with the sausage, decorating it with green onion and cheese and mayo. It was gone so fast, I had to make a second batch almost immediately. It was much faster, easier and more fun the second time around. Here give it a go yourselves!

Here’s what you need:

  • 1 teaspoon sugar
  • 1 1/4 teaspoon active dry yeast
  • 1/2 cup milk 
  • 1/3 cup sugar 
  • 1/4 cup butter 
  • 1/4 teaspoon salt
  • 1 egg, beaten
  • 2 cups all-purpose flour
  • 8 hot dogs / sausages
  • 1/4 cup shredded cheese
  • 1 stalk green onions
  • Mayonnaise
Here’s what to do:

  1. Dissolve 1 teaspoon sugar and yeast in 1/4 cup of warm milk. Make sure milk is not hot as high heat will kill the yeast. Let it stand for 10min so the yeast can activate. Warm the other 1/4 cup milk in a small saucepan until it bubbles, then remove from heat. Mix in sugar, butter and salt; stir until melted. Let cool until lukewarm.
  2. In a large mixing bowl, combine the yeast mixture, milk mixture, beaten egg, salt and 1/2 cup flour. Using the mix option on the stand mixer, add in the remaining flour, 1/2 cup at a time. Once combined, turn the dough onto a lightly floured surface and knead until smooth and elastic, about 8 minutes.
  3. Lightly oil a large bowl, place the dough in the bowl and turn to coat with oil. Cover with a damp cloth and let rise in a warm place until doubled in volume, about 1 hour. Dough will only rise if it is warm enough and damp enough.
  4. Punch the dough and knead. Separate into 8 equal pieces. If you prefer to make smaller buns, separate into 16 pieces and cut the sausages or hot dogs in half.  Flatten each piece by hand or rolling pin. Place a piece of hot dog on the edge and roll to wrap the hot dog completely. 
  5. Make 4 deep incisions on the hot dog buns making sure to cut through the hotdog but not the bottom part of the dough. You want the dough to be intact so you can rotate them to face up in opposite directions. Place them on a greased tray and let rest for 20 minutes. Preheat the oven to 350 degrees F
  6. Top buns with mayonnaise, green onion and cheese and bake for 20 min or until golden brown. 
Have fun and enjoy!

Friday 30 January 2015

The Vegetable Spiralizer

I heard of this new toy for my kitchen from a co-worker and I knew I had to get one. So when family and friends started asking me about what I wanted I told everyone I wanted a vegetable Spiralizer. 

This thing is so cool. 

I have been eating salads for lunch and they were getting a little boring. Using the Spiralizer, salads just got more fun!

Check this out!

I have done cucumbers, carrots and beets so far. 


Yesterday I tried zucchini and it turned out great! I sautéed it with Italian sausage and it was delicious. Just like noodles!


I ❤️ my veggie Spiralizer!


Saturday 27 April 2013

Coconut Chicken Soup

I just came back from a trip to GuangZhou. The food there is amazing. The most memorable one is actually a soup! The soup base is the coconut water and the chicken is cooked inside the coconut to get a fragrant savoury flavour. It's to die for!

Here's how you do it and its so easy, the hard part is getting the freakin coconut open!

Ingredients:

Coconut
2 small chicken drumstick
1 small piece of pork
3 dried Logan meat
A small handful of goji berries
Salt to taste

First you chop up the drumsticks into small pieces. You can de-bone and de-skin if you like. Everything else just needs to be rinsed and set aside.

Now you can buy coconuts at any supermarket. I got mine at Walmart. I googled how to open the top before I set out to make this soup and the instructions said it would be simple and did not require much strength. Well, 45 minutes later I finally popped the top open. My first try was frustrating but I can see how it could be simple now that I've got the experience.

To open coconut:

Using the bottom edge of a small cleaver or the sharp end of a hammer start hacking a circle around the top of the coconut. Keep going around it a couple of times until the circle is deep enough to see. Then, using all the strength you have left, you stick your cleaver into the circle. Your cleaver should get stuck to the soft meat of the coconut. A quick flick of your wrist and the whole circle should pop right off. Watch out for the coconut water leaking out!

Once you got the coconut open, pop all the ingredients inside. Have a pot of boiling water going with a ramekin sitting at the bottom. Place the coconut inside the pot and steam boil for 2 hours.

You will start smelling the heavenly aroma very soon. Enjoy!


Saturday 30 March 2013

Pork a l'orange

Cowie Wowie is on a no- carb diet. It can get stressful thinking of things to make him for dinner. Here is a recipe I found in a magazine that uses pork tenderloin for the main course. It's pretty simple and turned out to be quite flavourful and juicy.


First of all, you need to cut the pork tenderloin into 1/2 inch thick slices. Season with salt and pepper. Take the orange and cut them into half moons and cut in quarters.


Heat a frying pan and brown the pork tenderloin then set aside. Put in sweet and sour sauce or marmalade, chilli flakes and soya sauce in the pan. Add the pork and its juices and orange slices into the pan with the sauce until they are warmed through.

Serve immediately and enjoy!

Tuesday 17 January 2012

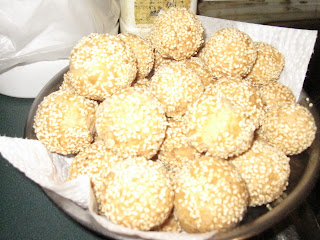
Chinese Smiling Cookies

Chinese New Year is coming up fast this year.  One of my favorite Chinese goodies is the smiling cookie.  It takes its name from the cracks that form when the cookie dough is deep fried to a golden brown.  Normally I would wait for some other family member to make them and bring them over when we do the Chinese New Year visits, but Cowie and Gohgoh got me a deep fryer!  

With this new deep fryer I can do anything!!  It is so easy to use and cleans up fast.  Mind you, the cleaning was aided by my Daddy and the making of the cookie was aided by my Mama.  Hehe, it was a family event like all Chinese New Year things.  


This smiling cookie is very easy to make.


Smiling Cookie

2 Cups of Flour
1 Tsp Baking Powder
1/2 Tsp Baking Soda
2 Eggs
1/2 Cup of Sugar
2 Tbsp Oil
3 Tbsp Water
Sesame Seeds

1. Sift together the flour, baking powder, and baking soda.

2. Beat together the sugar, oil, and water.


3. Pour the wet ingredients into the dry and combine well.


4. Roll dough into little balls and coat with sesame seeds.

 
5. Deep fry in hot oil until golden brown and the cookies begin to crack a smile.


These were so fun to make and it can involve the whole family if you want.  Happy Lunar New Year!!

Tuesday 20 December 2011

I Heart My Mama


My Mama’s birthday was in the middle of a very hectic holiday schedule.  Luckily, now on my 6th birthday cake I know my strengths and weaknesses.  Sponge cake is now my specialty.  And judging from the amount of cake my family eats, I decided a relatively small one will be more than adequate.  I chose a small heart shaped pan for the sponge.  I only had one pan so I had to bake it twice.  I always line the bottom with parchment paper so the cake can slide out easily.  The heart came out of the oven so fluffy and light! 


Since it was a relatively simple cake I wanted to make the filling special.  I drained a can of peaches and a can of lychee and cut them into bite sized pieces.  I whipped up some cream and sugar and put that aside.   As soon as the sponge cake layers cooled, I spooned a generous amount of whipped cream and fruit filling in the middle and frosted the cake. 


Due to the small surface area of the heart shaped sponge cake, I put too much filling in and found it hard to hide the imperfections with the whipped cream.


I looked around at what I had in the kitchen and found some ribbon that I was able to wrap around the cake.  It looked especially good because it accented the heart shape of the cake. 


When my Mama saw the cake, she said it looked great.  She also loved the peach and lychee filling and the light sponge cake.  Most importantly, she said look at how much money we saved this year by making our own birthday cakes!


Sponge Cake

1 Cup Cake Flour
1 Tsp Baking Powder
6 Eggs separated @ room temperature
1/2 Tsp cream of tartar
1/4 Tsp Salt
1 Tsp Vanilla
3/4 Cup Sugar
1/2 Cup Water
1/3 Cup Oil

1. Preheat the oven to 350 F
2. Sift flour and baking powder
3. In a large bowl combine egg yolk, salt, vanilla and 6 Tbsp of sugar.  Whisk until ribbon state.
4. Stir in water and oil and again whisk well.
5. Fold in flour but don't over-mix.
6. In another large bowl combine egg whites, cream of tartar and sugar. Beat until stiff.
7. Fold a third of the egg whites into the batter and mix gently until blended.
8. Fold in the rest.
9. Pour batter into paper lined pans and bake until golden brown about 45 min.


Saturday 26 November 2011

Lemon Strawberry Shortcake

Due to my Las Vegas trip Gohgoh's birthday cake was delayed.  Since I knew my brother has peculiar tastes, I asked him exactly what kind of cake he wanted. All he said was no to the following: Chinese Birthday cake, Sponge cake Black forest cake, Cheesecake, Chocolate cake and Tiramisu.  Gee thanks for all the help!  Then I remembered seeing a really good recipe for Strawberry Shortcake.  This he was okay with. 

I went shopping for strawberries in November and found that they weren't the ripest berries out there and they were certainly not the cheapest either.  I bought a box anyways and cut them into slices, mixed in some lemon juice and sugar and put them aside.   
Next, I worked on the cake.  I was worried that it would come out too dry and too hard because the recipe called for a lot of flour but it turned out fine.  The recipe made two good sized layers but I only used one.  My family is not a huge fan of cake and two layers of this size would not be appreciated.  I also should have sliced this layer in two but I was being lazy so I piled the filling all on top instead. 

While the cake was cooling, I made a lemon curd.  It was perfectly tangy and would go great with the shortcake and strawberries.


After spooning a good amount of lemon curd onto the shortcake, I began to line the edges with the strawberry slices.  This kept the lemon curd from dripping off the edge.  Then I placed a lot of strawberries on top of the lemon.  For future reference, I should have used only a thin layer of the lemon curd.  Too much made it too unstable and my parents thought it was just a tad too sour.


Finally to add the finishing touches, I whipped up some whipped cream and piped it on top of the strawberries.  A couple more strawberry slices and a cherry completed Gohgoh's strawberry shortcake!

Strawberry Lemon Shortcake

3 cups all purpose flour
2 teaspoons baking power
1/4 teaspoon baking soda
1/4 teaspoon salt
1 cup butter, softened
2 cups sugar
4 eggs, lightly beaten
1 1/4 cups buttermilk
1 teaspoon vanilla extract
2 cups of lemon curd

Step 1: Preheat oven 350 degrees F
Step 2: Line pan with parchment paper
Step 3: Sift flour, baking power, baking soda and salt in a large bowl
Step 4: Using electric mixer on medium speed, beat butter and sugar together until a milky yellow. Don't forget to scrape down the bowl.  Add eggs in 4 additions.
Step 5: At low speed, add flour mixture and buttermilk alternatively starting with the flour.  Beat in vanilla.
Step 6: Pour batter into pan and bake until golden and cake springs back lightly.
Step 7: Turn out cake to cool.
Step 8: Place berries in a bowl with sugar and lemon juice and let stand.
Step 9. Whip cream to soft peaks and add vanilla.

Lemon Curd

1/2 cup butter
1 1/4 cup sugar
3/4 cup fresh lemon juice
2 tablespoons lemon zest
6 eggs

Step 1: In a saucepan, combine all ingredients except for the eggs using medium high heat until the sugar is dissolved
Step 2: Whisk eggs while pouring in 1 cup of hot lemon liquid then transfer egg mixture back to saucepan.  Continue to cook until mixture thickens
Step 3: Cool and use with Shortcake

Assemble
Step 1: Use your imagination.  You can do a one layer cake or a 2 layer cake.  You can cut the cake into smaller sized pieces and serve individually.  You can do whatever you like!

Enjoy!